Sunday, April 25, 2010

homemade apple pie


I spotted some delicious granny smith apples at the Farmer's Market and instantly started to crave apple pie.

crust recipe
1/2 cup ice-cold water
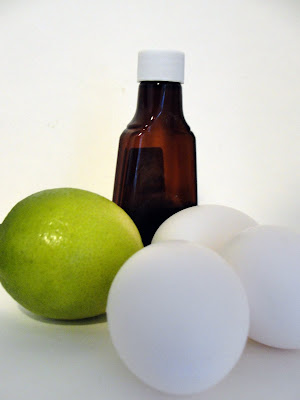
2 cups all purpose unbleached flour
1/2 salt (omit if using salted butter)
12 tbsp butter (cut into cubes)


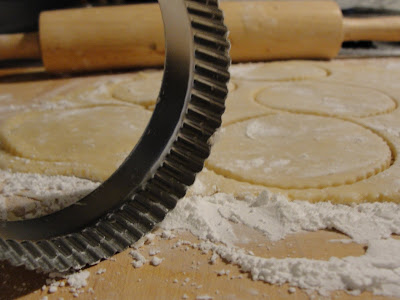
Combine butter and flour in a electric mixing bowl fitted with a paddle attachment. Mix for 2 minutes on medium speed. Turn to low speed and gradually pour the water until the dough begins to clump. Divide the dough into two balls. Wrap the dough balls in plastic wrap and refrigerate for at least one hour.
*You can always freeze it for later use, as well.*

Meanwhile you can begin to make the pie filling.....


Pie Filling
3 granny smith apples
1/2 cup brown sugar
1/2 cup granulated sugar
1/2 tbsp cinnamon
1/4 tbsp nutmeg

Peel and slice your apples. Combine with sugar and spices.

Now that your pie crust has had plenty of time to cool, divide it into two, equal halves. Roll one of the balls of pie crust out until it is around 1/8th of an inch thick. Once you have rolled out the dough, wrap it around the rolling pin and unroll it onto your pie pan.

Once you have shaped it to fit the inside of the pan, take a fork and poke holes in the bottom of the crust. This will let the steam out as the pie bakes. Dump all of the apples in the pie. Place about 4 chunks of butter on top of apple filling. This will give the filling rich flavor. Roll out the remaining pie dough and place it on top. Create a pattern around the edge of the pie by using the back of a knife. Cut long strips of tinfoil and place them around the edge of the pie. This will prevent the crust's edge from burning while it bakes. You will want to take the tinfoil off about ten minutes before the pie is done. This way, the apple pie will have a golden brown edge. Bake your pie at 400 degrees for 50-60 minutes. For a glossy effect, brush a small portion of egg white on top of the crust when you remove the tinfoil.

hint: Place a cookie sheet covered in tinfoil on the lowest oven rack (not on the same rack as the pie) to prevent any overflow from reaching the bottom of the oven--easy cleanup!


Tuesday, February 16, 2010

almond raspberry mini-cakes


This recipe is very cute for valentine's day!!!


cake ingredients
1 2/3 cups toasted slivered almonds
2 cups sugar
1 cup all-purpose flour
1 teaspoon baking powder
1/2 pound (2 sticks) unsalted butter
2 teaspoons pure vanilla extract
12 large egg whites, at room temperature

In the bowl of a food processor fitted with a metal blade, combine the almonds with 2/3 cup of the sugar and pulse grind until it is a coarse flour. Transfer the almond flour to a large bowl. Add the all-purpose flour, an additional 2/3 cup of the sugar, and the baking powder, and whisk to combine.

Have ready a fine-meshed strainer. In a medium heavy-bottomed saucepan, brown the butter over medium heat. (The butter will melt first, and then the milk solids will settle to the bottom. After a little while, the milk solids will start to turn golden.) When the milk solids have reached a nutty brown color, immediately remove from the heat. Using the fine-meshed strainer, strain the butter into the flour mixture. Stir to combine. Discard the butter solids. Stir in the vanilla.

In the bowl of an electric mixer fitted with a whip attachment beat the egg whites on medium-high speed until they hold soft peaks. If there is even one speck of yolk in the whites they will not form soft peaks properly because the fats in the yolk will prevent the proteins in the whites from adhering to one another. In a slow steady stream, with the mixer on medium speed, add the remaining 2/3 cup of the sugar. Increase the speed to high. Beat until there are firm – not dry – glossy peaks of meringue.

Using a rubber spatula, briskly fold one-third of the meringue into the batter to lighten it. Add the remaining meringue and gently fold in until just combined.

Divide the batter evenly between the prepared cake pans. Spin the pans or use an offset spatula to level the batter. Bake for 25 to 30 minutes, or until a fork inserted into the center comes out clean. Remove to a wire rack to cool in the pans for 20 minutes before turning the layers out onto the rack. Cool completely.

raspberry filling ingredients
4 oz. mascarpone cheese
4 oz. heavy cream
1/8-1/4 cup sugar

1 tablespoon raspberry liquor

In a bowl mix together the cream and sugar until it has a thick whipped consistency. (I only used about 1/8 cup of sugar as I didn't want it to be super sweet. Add the cheese and liquor and mix until all ingredients are combined. It will have a fairly thick consistency.

Now you are ready to assemble your cakes. U
se a serrated knife to trim off any excess cake that has domed or risen up, and make your layers as flat and even as possible. Use a round cookie cutter and begin cutting small circles of cake. Now you are ready to construct the layers. Spread with a spatula a small amount of the raspberry filling and then "sandwich" it with the second cake circle. Finish garnishing by adding another dollop of filling on top and decorate with fresh raspberries. Sprinkle with powdered sugar (at request of my husband). Happy Valentine's Day!!!


Sunday, January 3, 2010

turtle cheesecake


This was the first time my cheesecake did not crack. I put it on a wire rack immediately after removing from oven. I planned to let it cool on my kitchen counter, but remembered that my cats are little piglets and would most likely nibble it. I decided to put the cake (still sitting on wire rack) in the microwave. It just fit. I left it in the microwave for about six hours (actually forgot it was in there while watching the Saxondale). I put it into the refrigerator to chill overnight. In the morning it was PERFECT, no cracks!


Ingredients
1 3/4 cups chocolate graham cracker crumbs
1/3 cup butter or margarine, melted
3 (8 ounce) packages cream cheese, softened
1 (14 ounce) can sweetened Condensed Milk
1/2 cup granulated sugar
3 large eggs
3 tablespoons lime juice
1 tablespoon vanilla extract
1 1/2 cup milk chocolate morsels
2 tablespoons caramel syrup or ice cream topping
1/2 cup coarsely chopped pecans
1/4 cup semi-sweet chocolate mini morsels

Preheat oven to 300 degrees F. Grease 9-inch springform pan. Combine crumbs and butter in medium bowl. Press onto bottom and 1 inch up side of prepared pan.
Beat cream cheese and sweetened condensed milk in large mixer bowl until smooth. Add sugar, eggs, lime juice and vanilla extract; beat until combined.
Microwave 1 1/2 cups of the milk chocolate morsels in medium, microwave-safe bowl on high power for 1 minute and stir. Morsels may retain some of their shape. If necessary, microwave at additional 10- to 15-second intervals, stirring just until morsels are melted. Stir 2 cups of cheesecake batter into melted morsels; mix well. Alternately spoon batters into crust, beginning and ending with yellow batter.

Bake for 1 hour and15 minutes or until edge is set and center moves slightly. Cool completely on wire rack in microwave for 3-5 hours. Drizzle caramel syrup over cheesecake. Sprinkle with pecans and mini morsels. Refrigerate for several hours or overnight. Remove side of pan.


Monday, December 21, 2009

pistachio, cherry, chocolate chip cookies

This simple recipe turned out to be one of my favorites. I enjoyed some wine while making them, so I can assure you that this is a fast, easy recipe!

Ingredients

2 sticks unsalted butter, at room temperature
1 cup granulated sugar
2/3 cups dark brown sugar
2 large eggs
2 1/2 teaspoons pure vanilla extract
2 1/3 cups all-purpose flour
1 1/2 teaspoons baking soda
1 teaspoon salt
1 cup semi-sweet chocolate chips
1 cup white chocolate chips
3/4 cup dried cherries
1 cup finely chopped pistachios

Preheat the oven to 375 F.

In a large bowl, beat butter and both sugars. Then beat in the eggs and vanilla extract until smooth. Mix flour, baking soda, and salt in a small bowl and add to the large bowl, and beat until just combined. Stir in the chocolate chips, cherries, and pistachios.Drop 2 tablespoons of cookie dough 2 inches apart (they will spread).Bake cookies for 13-15 minutes, or until firm and golden brown around the edges. Transfer to a rack and cool for 15 minutes.


chocolate dipped sugar cookies


I wanted to make a dipped chocolate cookie for the holidays...and my initial recipe was for red velvet cookies. The recipe seemed odd to me (no eggs, no milk, no shortening?) I made it regardless, and the dough was so dry that I decided to add an egg anyway...and that was a big mistake. The dough then became too moist. I threw it out and decided to make basic sugar cookies instead!

Ingredients
3 cups all-purpose flout
3/4 teaspoon baking powder
1/4 teaspoon salt
1 cup unsalted butter (room temperature)
1 cup granulated sugar
1 egg (beaten)
1 tablespoon milk
1/2 bag white chocolate chips
1/2 bag milk chocolate chips
2 tablespoons vegetable oil
powdered sugar (for dough rolling; in place of traditional flour)

Preheat your oven to 375 degrees F.

First sift together the flour, baking soda and salt. Set aside. Place the sugar and butter in an electric mixer and beat until light in color. This can take up to 10 minutes. Add the egg and milk and beat until combined. Put the mixer on low speed and gradually add the flour mixture until the mixture pulls away from the side of the bowl. (keeping it on low speed will avoid flour puffs) Once the dough is mixed you will divide it in half. Wrap each dough half in wax paper and store in the refrigerator for approximately two hours.

Sprinkle surface where you will roll out dough with powdered sugar. Remove 1 wrapped pack of dough from refrigerator at a time, sprinkle rolling pin with powdered sugar, and roll out dough to 1/4-inch thick. Move the dough around and check underneath frequently to make sure it is not sticking. If dough has warmed during rolling, place cold cookie sheet on top for 10 minutes to chill. Cut into desired shape, place at least 1-inch apart on greased baking sheet, parchment, or silicone baking mat, and bake for 7 to 9 minutes or until cookies are just beginning to turn brown around the edges, rotating cookie sheet halfway through baking time. Let sit on baking sheet for 2 minutes after removal from oven and then move to complete cooling on wire rack.

After the cookies are cooled. Microwave half of the white chocolate with a tablespoon of vegetable oil for 30 seconds. If the morsels are not completely melted, microwave for an additional 30 seconds. Dip half of the cookie into the melted chocolate. Sprinkle holiday nonpareils on the cookies! Repeat the same melting/decorating process with the milk chocolate.

**The white chocolate dried much better than the milk chocolate. The milk chocolate remained sticky, even after storing over night. Next time I would only use white chocolate for dipping. Maybe semi-sweet chocolate would harden better than the milk chocolate?**

Saturday, December 5, 2009

double chocolate cupcakes

I decided to bake chocolate cupcakes from scratch. This is my second attempt. The last time I attempted this recipe I accidentally used un-sweetened cocoa...and needless to say they were not that tasty. I cried and threw them out. My second attempt was a success!!! yeaahh!


Cake Ingredients
4 ounces unsweetened baking chocolate, coarsely chopped
2 cups cake flour

1 package instant chocolate pudding

2 teaspoons baking soda

1/2 teaspoon salt
6 tablespoons sweetened cocoa powder (*if possible splurge on fancy cocoa; it's worth it)
8 tablespoons softened butter (1 stick)
2 1/2 cups brown sugar
2 teaspoons vanilla extract
3 eggs, at room temperature
1/2 cup milk 1 cup boiling water

First pre-heat the oven to 350 degrees. In a large bowl stir the cake flour, baking soda, pudding and cocoa powder by hand until mixed. Set aside. Next you can chop the chocolate into course pieces and melt in the microwave for 2 minutes. Set aside.

Add butter, vanilla and brown sugar into a the electric mixer's bowl and mix for at least ten minutes. Do not skimp on this step; it's the key to a soft,
voluminous cake. The sugar cuts into the butter, creating air pockets, and the butter gets lighter, the air pockets expand and multiply, which creates the softness. Next, add the eggs one by one into the batter. It may start to look a little curdled after the eggs are added; but don't worry, this is normal.

When fully incorporated, stir the melted chocolate and half of the dry flour ingredients. (Remember to set the electric mixer's speed to low when you add the flour, to avoid poofs of flour everywhere). Pour the milk into the batter a little at a time, while also adding the remainder of the flour ingredients. Your final step will be to pour in the boiling water. Add water slowly. You may not need to use the full cup. You want to mix until just incorporated.

Now you are ready to spoon the batter into the cupcake papers. This recipe will make 24 cupcakes. Bake for about 30 minutes. Remove and cool on cooling rack.

Meanwhile you can create the icing.


Icing Ingredients
1 cup butter at room temperature

5 cups confectioner's sugar
2 teaspoons vanilla extract
1/2 cup sweetened cocoa powder

1/2 cup milk

Place butter in the bowl of the electric mixer. Beat on low until softened. Add vanilla. Add confectioner's sugar, about 1 cup at a time, and beat on low. Scrape down the beaters and bowl. Now you can add cocoa powder and mix until blended. Add a little milk at a time, increasing the speed of the mixer as the chocolate icing becomes creamier. Beat on high for 2 minutes. Place icing in pastry bag and decorate!!!


Tuesday, November 24, 2009

fresh blackberry walnut tarts

For my first post I will be baking fresh blackberry walnut tarts. I made them at the request of Vince for Thanksgiving. This was the second time I baked tarts, so I was familiar with the recipe. The dough is super easy and fast to make, and you only need to add sugar to create the blackberry/walnut filling.

Your first step is to prepare the pastry (tart dough).

Ingredients

1/4 cup ice-cold water
2 cups all-purpose unbleached flour
1/4 cup sugar
1/4 teaspoon salt (omit is using salted butter)
8 ounces cold butter, cut into small (1/4 inch) cubes

I did some research to understand why certain flours are used for different baked goods. The main distinction is the amount of gluten (proteins) in the flour. When flour is mixed with water the proteins are activated, and will become elastic. Gluten is good for bread, since it requires more support in order to rise. Tarts on the other hand can become tough and mealy with too much gluten.
All-purpose flour is best for creating tart dough. It has just the right amount of gluten to give the pastry a flaky texture.

To create the dough you will first combine the butter and flour in mixer for no more than a minute, at medium-low speed. Remember that the butter needs to be refrigerator temperature; soft butter can melt when mixing and the dough can become oily. Next you will pour three quarters of the ice-cold water into the bowl and mix for approximately 30 seconds. I measure the water in the measuring cup and keep it in the freezer for five-ten minutes. You can add the additional water until the dough begins to clump together. You can test the pastry by squeezing it together. If it falls apart, you will need to add a little more water. When the dough is at the perfect consistency you will hand roll it into a ball and wrap in plastic wrap. You will need to refrigerate it for at least an hour before you roll it out. (TIP: If you refrigerated for an extended period of time, you want to allow 20 minutes for the dough to become room temperature. This will make it easier to roll).


Meanwhile you can start to create the filing, and preheat the oven to 400 degrees.

Ingredients
2 cups fresh blackberries
1/2 cup sugar
1/2 cup walnuts (broken into small bits)

Combine all ingredients gently. You don't want to break the berries, since they are fragile. You only want to coat with the sugar and add the walnuts.


The next step will be to roll you dough for the tarts. Roll dough out on work board to less than 1/4-inch in thickness. I used six tartlette tins, so I divided the dough into six. After dividing the dough you can begin to mold it into the bottom and sides of the tin with your fingertips.

Finally place berry mixture inside the shells. Bake for 20 to 25 minutes, at 400 degrees F. Allow the tarts to cool for at least 15 minutes, and serve with vanilla ice cream, whipped cream or Creme
Fraiche. Enjoy!!!